
Precision is the little secret when learning how to measure a yard. Grab a tape measure, size up squares by length and width, and circles by radius. Odd shapes? Split them into rectangles and add up.
Whether you’re laying sod, designing the perfect garden, or building a shed, measuring your yard is the foundation. Accurate measurements help you buy just the right amount of mulch, seeds, fertilizer, or other landscaping materials you might need.
Yet, staring at an oddly shaped stretch of grass and multiple bushes, you may wonder where to begin. How do you turn this array of corners, curves, and greenery into a set of practical numbers? Let’s turn the complex into simple, shall we?
Step-by-Step Guide To Measure Your Yard
When we say ‘yard’, what are we talking about? In landscape terms, a yard is the outdoor area surrounding your house. Often mixed with the term ‘garden’, a yard includes entry walkways, patios, lawns, flower beds – anything that isn’t covered by the actual structure of your home.
In measurement terms, though – a ‘yard’ refers to a unit equal to 3 feet. However, in this guide, we’ll be using the term to reference your physical outdoor space.
*Note: Yard measurements are typically done in square feet to calculate the area accurately and easily.
Step 1. Gather Your Supplies
Having the correct tools at your disposal can make the task of measuring your yard that much simpler. Here’s what you’ll need:
- Measuring tape (preferably 100 feet or longer) or measuring wheel;
- Paper and pen for sketching;
- Garden stakes (to mark areas, if needed);
- String (to outline different parts of your yard) ;
Pro tip: It’s always good to have some brightly colored flags or spray paint on hand as well to mark specific points of measurement – especially if you’re dealing with larger yards.
Step 2. Sketch Your Yard
Before you take measurements outside, create a rough estimation of your yard’s layout on paper. While it doesn’t need to be precisely scaled or detailed, this sketch will serve as an outline for where you’ll be taking measurements.
First of all, visualize the area you’re working with. It could be the entire yard or specific parts if you’re looking to landscape particular zones. Does it resemble a square, rectangle, triangle, or circle? Or is it an odd shape that doesn’t quite match any of these standards?
Let’s split it into digestible chunks:
- Rectangular or Square Yard: Simply draw a square or rectangle on your sketch to represent the yard. It is one of the simplest shapes to measure, as you only need to record two measurements – length and width.
- Circular Yard: Draw a circle on your sketch. The measurement you need for this is the diameter (The diameter is the distance from one side of the circle to the other, passing through the center point.)
- Triangular Yard: To measure a triangular yard, you will need to get the length of the base and the height (perpendicular distance from the base to the opposite point of the triangle.)
- Irregular or Odd Shapes: Break it down into two or more manageable parts. These might be circles or rectangles based on the shape of your lawn. You’ll measure each shape independently, then add the areas together for your total yard size.
Pro tips:
- Mark the Unique Spots: If you know that there is a tree, bush, or flower bed in the corner of your yard, mark it on your sketch. Draw them as squares or rectangles wherever possible because they’re the easiest shapes to measure.
Not only will this help with orientation when you take measurements outside, but it also helps account for objects/areas that may not require specific treatments or changes (like areas where you won’t be laying sod or mulch).
- Label Each Shape: Use a letter or number so you can keep track of your measurements.
- Use Graph Paper: It comes in exceptionally handy when sketching landscapes. Even if you don’t want to be technical about it, graph paper allows you to follow a general scale (e.g. one square could equal 1 foot in real life.) Also, it can help you draw straight lines and maintain proportions as you’re sketching out your yard layout.
Step 3: Measure the Basic Layout of Your Yard
Here is where you’ll need your measuring tape or wheel, stakes, strings, and that rough drawing you made earlier. Choose a starting point. If you’re dealing with an odd shape, start by looking for the most straightforward area to measure first.
- For Rectangular or Square Sections: Place a stake at the four corners, pull your string or tape measure from one stake to another, and note down the measurements for length and width.
- For Circular Sections: For any circular spaces (like round flower beds), place your stake at the center of the circle. Then measure from the middle to the edge of the circle with your tape or string. This measurement is known as radius. To find the diameter – which you’ll need for further calculations – simply double this number.
- For Triangle Sections: If your area is a triangle, first place the stakes at each of its three corners. Then, measure from one stake to another and note the measurements for all three sides.
- For Irregular Sections: Look at your drawing and split those tricky parts into basic shapes like squares and triangles. Use sticks and string to mark each area in your yard. Then, measure them one by one and write down each size on your drawing.
Pro tip: Teaming up with someone can make this whole thing go smoother – it’s super handy when you’re dealing with long measuring tapes and large areas. So, if you’ve got a friend who can help out, now’s a great time to call them over.
Step 4: Calculate the Area of Each Shape
The finish line is in sight. It’s time to turn those measurements into something you can use – the area of each part of your yard. Why are we doing this? Accurate areas help you buy just the right amount of seeds, mulch, fertilizer, or other materials you might need – no more, no less.
Grab a calculator or do it the old-fashioned way with a pencil and paper. We’ll guide you through the basics:
Square or Rectangular Areas
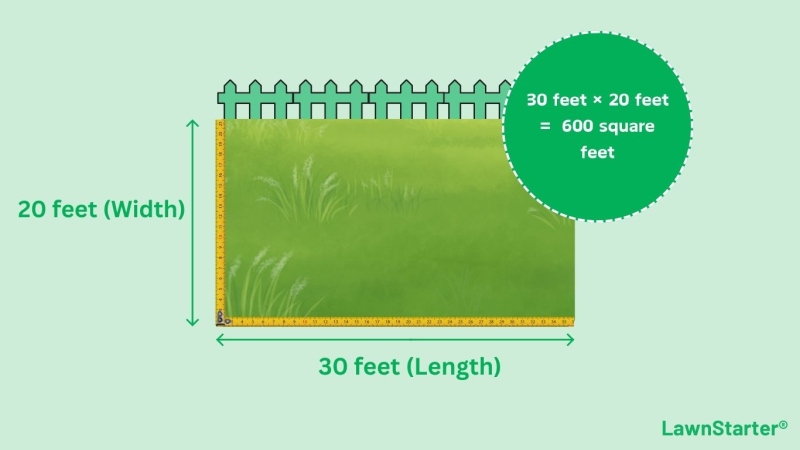
Life is great when it goes by the book – and by that, we mean straight lines and right angles. Rectangle or square sections are the easiest to calculate. Multiply the length by the width of each rectangle to get its area.
Area (square feet) = Length (feet) × Width (feet)
Example: If you have a rectangular lawn that’s 30 feet long and 20 feet wide, its area would be:
Area = 30 feet (Length) × 20 feet (Width)
Area = 600 square feet
Circular Areas
When dealing with circular elements like a round flower bed, your approach needs to be slightly adjusted. Remember how you measured the distance from the stake at the center of the circle to its edge?
That’s known as the radius – a line that stretches from the heart of your circle straight out to its edge.
On the other hand, we have a term called diameter. It is essentially just twice as long as the radius. In other words, it’s a line that goes from one edge of the circle, passes through the center, and reaches the other side
Now, depending on which measure you’ve got – radius or diameter – we can roll into two different scenarios for calculating the area:
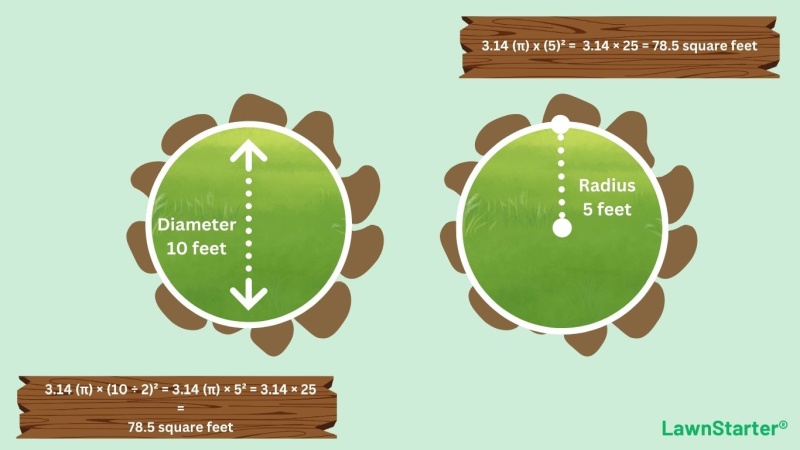
Scenario 1: You’ve measured across the circle for your diameter:
Area (square feet) = 3.14 (π) × (Diameter (feet) ÷ 2)²
Scenario 2: You measured only the radius:
Area (square feet) = 3.14 (π) × Radius²
*Note: 3.14 is a mathematical constant known as Pi (π), used whenever we’re dealing with anything circular.
In both cases, remember that squaring (represented by the “²” symbol) means multiplying a number by itself. Squaring the radius or half the diameter is what gives us the area of a circle when multiplied by Pi (3.14).
Example 1. For a circular flower bed with a diameter of 10 feet, the area would be:
3.14 (π) × (10 ÷ 2)² = 3.14 (π) × 5² = 3.14 × 25 = 78.5 square feet
Example 2. If the radius of your circular flower bed is 5 feet, you should calculate the area as follows:
3.14 (π) x (5)² = 3.14 × 25 = 78.5 square feet
Therefore, if a circular yard or section of your yard measures 10 feet across (the diameter), then that circular area has a total of about 79 square feet (rounded to the nearest whole number).
*Note: Do your math neatly and in order—you’d hate to buy too much or too little because of a mistake in your calculations. Keep first the division within brackets (if you’re working with diameter), then square it before multiplying by Pi (3.14).
Triangular Areas
Triangles might remind you of geometry class rather than a typical family garden. Yet, they are especially handy when calculating irregular yard characteristics such as slanted garden patches or oddly angled corners.
For measurement purposes:
- Base – The base is one side of the triangle. Think of it as the bottom or ground line.
- Height – The height is the perpendicular distance from the base to the opposite vertex (the ‘peak’ or top point of your triangle).
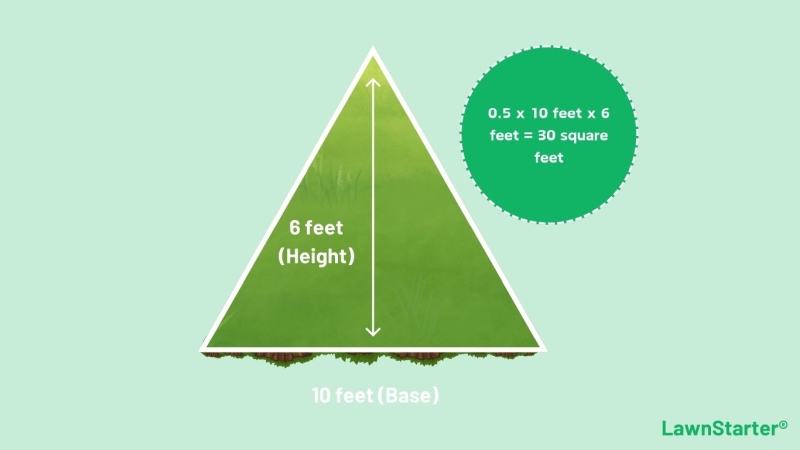
For triangular areas, apply this simple formula:
Area (square feet) = 0.5 × Base (feet) × Height (feet)
Example: Consider a triangular patch of lawn with a base of 10 feet and a height of 6 feet. Using the formula, you would calculate the area as follows:
0.5 x 10 feet x 6 feet = 30 square feet
Step 5: Add the Areas of Each Shape to Get Total Yard Area (If Necessary)
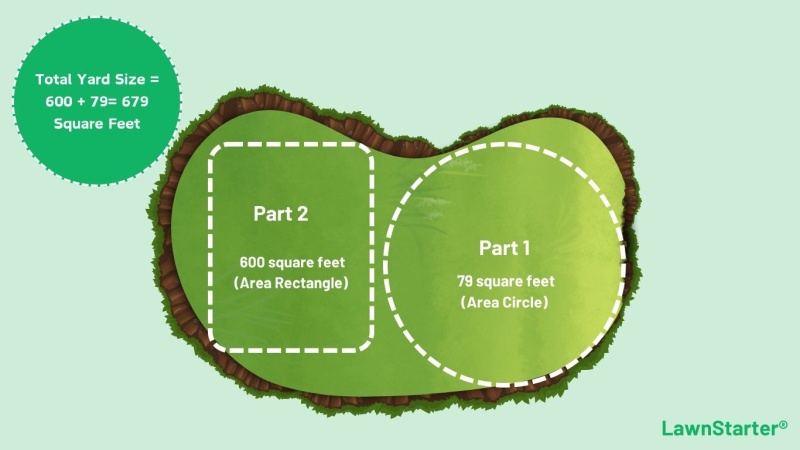
Have you finished measuring and calculating all the sections of your yard? Now comes the finale. Simply add up all those areas to find the total size of your yard.
Area (Total Yard) = Area (Part 1) + Area (Part 2)
… and so on till you’ve accounted for all sections
*Note: If parts of your yard aren’t part of your project (like a deck or pool), subtract those areas from your total. So, you only count the sections you’ll be working on.
Example: Suppose you have a yard with the following three sections:
- A rectangle section measuring 600 square feet;
- A circular section totaling 79 square feet;
In such a case, here’s what your calculations would look like:
Total Yard Size = Area Rectangle + Area Circle
Total Yard Size = 600 + 79= 679 Square Feet
Other Options for Measuring Your Yard
There are other methods you can use to determine the size of your yard aside from using a tape measure. Remember, though, each approach comes with its own set of advantages and disadvantages. So, let’s take a quick peek at some alternatives:
Measure a Yard by Walking
Taking a stroll to measure your yard is no doubt one of the most relaxing methods. Yet, it’s not always the most accurate because we all walk differently – some people stride far, some shuffle their feet, and everything in between.
Here’s how to measure a yard by walking:
Method 1. Step Counting
- Begin at one end of your yard and walk linearly (either length or width-wise) to the opposite side.
- With each footstep, count how many steps it takes to get from one end to the other.
- Walk normally (don’t take giant leaps or small foot drags) – take regular steps as if you were walking down a sidewalk.
- Each step usually equals approximately 2.5 feet (bear in mind this average can differ based on an individual’s height and gait.)
- Multiply your number of steps by 2.5. The result is your yard’s estimated length or width.
- Count the same way for all sides you need to measure based on the shape of your yard/area. For square footage, multiply those numbers together or add them up straight when they’re already areas.
Method 2. Pacing
- Place heel to toe all across the yard area;
- As each foot lands, count “one”. You would do this throughout the entire space of needed measurement.
- Once you reach the endpoint along one direction (be it length or width), write down the number and start again from zero for the next side.
- Each footstep equals approximately 1 foot.
- Multiply your total number of steps by 1 to obtain your estimated length or width in feet.
Pros:
- Quick and easy; no technical equipment required.
- Good for immediate and approximate measurement when that’s all you need.
Cons:
- Not the most accurate method, as the size of one’s stride or footstep can vary.
- It can be physically demanding, especially on larger yards.
- The averaging ‘1 stride = 2.5 feet’ rule doesn’t apply to everyone equally. For some, it might be more or less depending on their height and stride length.
- The averaging ‘1 footstep = 1 foot’ rule doesn’t apply to everyone equally.
- Open to common human errors like missing or double-counting every time your toe hits the ground next.
Satellite Yard Measuring Tools
Technology has certainly come a long way in helping us measure yards without even having to step outside. You can now calculate the size of your yard using online mapping sites like Google Earth, various property websites, or specific landscape-measuring apps
For instance, Google Maps area calculator is an easy-to-use website where you input your address and trace the outline perimeter of your lawn. The total area will be auto-calculated for you.
How to Measure My Yard on Google Maps
In order to measure your yard using Google Maps, you’ll need to use its desktop version and follow these steps:
- Using the search bar, type your home address.
- Zoom in on the satellite view until you can clearly see your property boundaries;
- Once you have a detailed view of your house and yard on screen, right-click anywhere inside that area.
- Select “Measure distance” from the drop-down menu.
- Click on your starting point and draw lines along the outer edges of your yard by repeatedly clicking at each corner.
- If your lawn is divided into separate sections, measure each section individually and add the areas together for your total lawn square footage.
- You can clear the measurement to start over by right-clicking and choosing “Clear measurement”
Pros:
- Huge time-saver.
- Ideal for drawing shapes and calculating the area of irregular yards or lawns.
- Most apps/tools have an ‘undo’ button, allowing you to modify measurement lines for precision.
Cons:
- Online maps might not always be up-to-date, especially if you’ve had recent landscaping work done (like adding patios or pathways).
- Not all websites cover every location (rural areas can occasionally have less detail available).
Measuring Method via Apps
Speaking of digital era convenience – your smartphone also offers a multitude of apps that leverage augmented reality and mapping technology for home measurement calculations.
Visit the App Store to discover mobile tools that allow you to measure the yard (or anything else) with just a few taps and swipes on your phone screen.
*Note: Each app is different, so you’ll need to follow the individual instructions provided by each one.
Pros:
- Easy to use.
- Provides comparatively accurate measurements.
- You can save your prior size readings for future reference – it comes in handy when planning further landscape changes.
Cons:
- The accuracy is dependent on the quality of your device’s camera, its calibration, and how steadily you can hold it.
- Individual apps might charge for premium features or ad-free usage.
Laser Measuring Devices
For vast terrains, consider using laser measuring devices, such as a laser tape measure. Not only does it provide accurate readings, but it also simplifies the measurement process when compared to traditional tapes.
Here’s how you can use a laser measuring device:
- Place your device at one end of the area being measured.
- Point it the direction of the other endpoint.
- Check and note down the reading shown on its screen.
- Repeat for all sides/measurements that you need.
Pro Tip: They work best on solid, flat, and light-colored surfaces.
Pros:
- Quick and easy to use – Laser measures can often calculate area and volume automatically, which is an added benefit.
- Extremely precise readings even over long distances;
- Ideal for both indoor and outdoor measures, including those hard-to-reach places or sloping gardens without needing another person’s help.
Cons:
- Could be slightly expensive if you don’t frequently have use for such a tool.
- Technology hiccups like battery failures or device malfunctions can cause interruptions.
- Environmental conditions like temperature, humidity, and bright sunlight can affect their performance.
FAQ About Measuring a Yard
How do I measure my lawn with measuring tape?
To measure your lawn using a measuring tape, start by placing the ‘0’ end of the tape at one point (corner) of your yard. Unroll the tape in a straight line towards another corner or endpoint while keeping it flat against the ground. Write down this measurement and move on to measure other sides/sections depending on your yard’s shape.
Ask someone to help, especially for larger and irregularly shaped yards. Use the string and stakes to outline each section if needed.
How many feet is 1 yard??
3 feet make up 1 yard. The ‘1’ mark on a standard measuring tape represents 1 foot (12 inches), which is less than 1 yard. Markers ‘3’ and any multiples thereof (6′,9′,12′) on your tape are your yard markers.
What is the easiest way to measure a yard?
The simplest method would be to use an online tool like Google Maps. However, this method may not always provide up-to-date or accurate results if there are recent changes in landscape features and details.
For more accurate results, grab a tape measure or measuring wheel and calculate directly in your yard. A little work but much more precise.
Upgrade Your Yard with a Pro’s Touch
Whether you want new grass, pretty flowers, or a veggie garden, measuring your outdoor space right makes everything better. Think of your yard as small shapes – squares, and circles can make tricky bits easier to handle.
Equip yourself with a measuring tape or wheel, stakes, and string. Sketch out your yard’s layout and identify each section you’ll be measuring. Remember: rectangles need length and width, circles need their diameter (or radius), while triangles require base and height lengths.
If you’d rather relax or feel like this process is a bit too technical, hire a local landscape expert. With a range of services available, from mowing your lawn to more specialized landscaping projects, they take care of it all – no measurements required on your part.
Main Photo Credit: Farm / Adobe Stock generated with AI