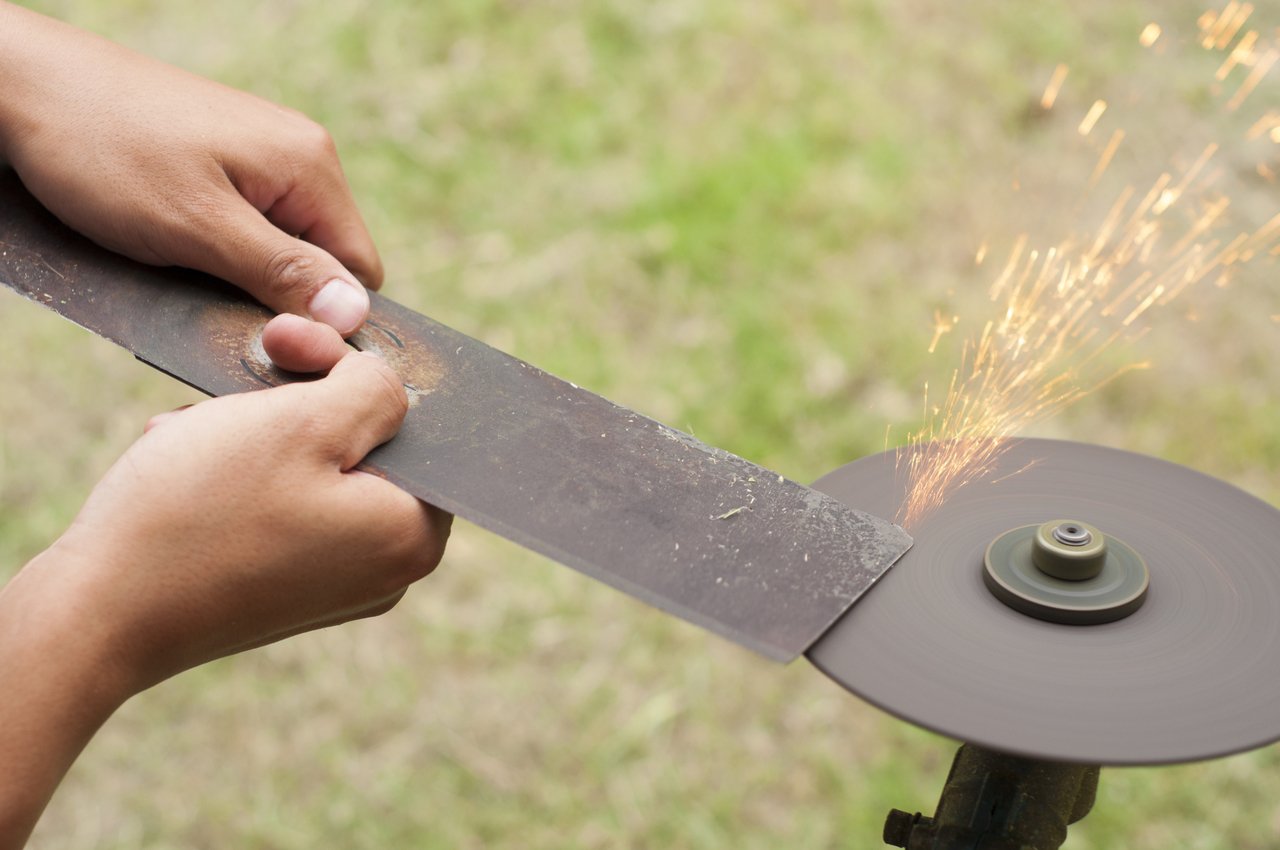
Use a metal file for perfect control, a sharpening stone if you’re more of a power-tool person, or an angle grinder if you want results fast. Focus on angle, pressure, and balance.
We’ll tell you how to sharpen lawn mower blades at home like a pro, with all the important details that make the process smooth and safe — including field-tested tips from experts. It’s easier than you think, and it helps you keep the lawn neat and healthy with lower costs.
| Project difficulty: Beginner to Intermediate Estimated time to complete: 5 to 45 minutes, depending on the method Project cost: $60 to $110 for essential tools like a vise, sharpener, and penetrating oil |
Why Sharp Mower Blades Matter
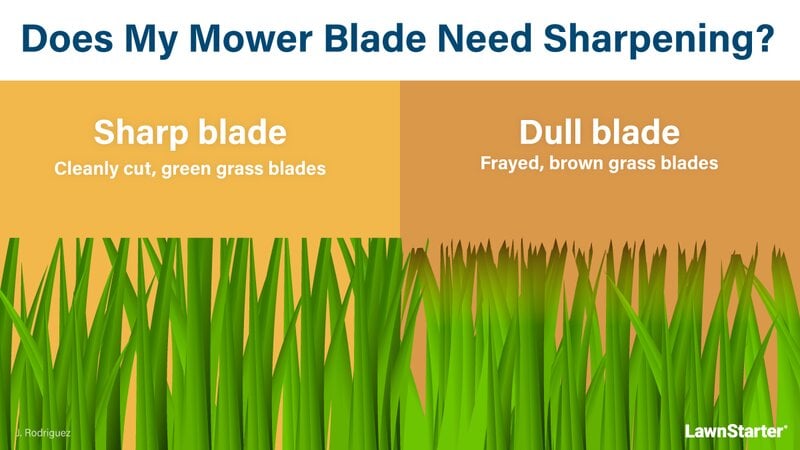
Sharp blades slice through the grass cleanly, keeping your turf well-manicured while protecting the lawn from diseases and pests. “A properly sharpened blade improves cutting performance, reduces stress on the grass, and keeps your lawn looking healthier and greener,” says Jason Keeley, a lawn care and mower expert and founder of Mowing Magic in North Garden, Virginia.
By contrast, dull mower blades can’t make clean cuts. They leave behind an uneven lawn, tearing and ripping the grass leaves. The rugged edges expose the turf to fungal infections and pest damage, while the frayed tips dry out fast, giving the lawn a dull, tannish cast no amount of fertilizer can fix.
Experts at Cornell University say a dull blade can also increase fuel consumption by 20% to 30%.
Pro Tip: How sharp should mower blades be for a lush, healthy lawn? Aim for the sharpness of a butter knife — sharp enough to slice smoothly through the grass yet strong enough to resist nicks and chips.
See Related:
How to Tell Your Mower Blades Need Sharpening
If you pay attention, the mower and the lawn will tell you when the blades need sharpening. Here are the tale-telling signs of a dull blade:
- While mowing the lawn: You work harder than usual and need to mow the same areas multiple times.
- Right after mowing: Grass blades have rugged edges, the grass height is uneven, and turfgrass looks like it’s being pulled out rather than cut.
- Two to three days after mowing: The lawn gets a yellowish, dull cast, like it’s been sun-scorched.
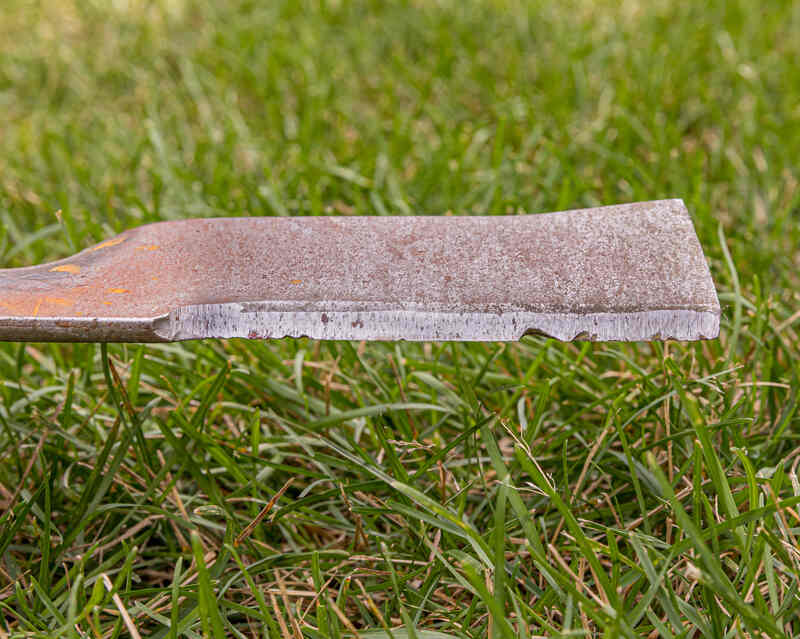
Those are your cues to check the mower blade. A dull blade has a rounded edge and often lacks a sharp point. It can also have rust build-up or nicks and dents along the edge.
Safety Precautions for Blade Sharpening
Sharpening your lawn mower blades removes metal in very small pieces, which can get in your eyes or nose. Power tools can also generate sparks. To play it safe, wear safety goggles, a face mask, and long sleeves.
Also, wear thick work gloves to avoid accidentally cutting your skin, and wear hearing protection if you use a powered lawn mower blade sharpener.
Important: Disconnect the mower from its power source before performing any maintenance to prevent accidental startups.
See Related: Lawn Mower Safety Tips
Tools You’ll Need
If you’re handy with tools, you likely already own most of the essentials for sharpening your mower blades. Here’s a list to check:
| Tool | Why You Need It |
| Permanent marker or spray paint | Marks the blade orientation in the housing. |
| Rag or cloth | To clean and dry the blade. |
| A wood block or a blade lock. | Keeps the blade from spinning. |
| Ratchet and socket or a wrench | To loosen nuts and bolts. |
| WD-40 or another brand of penetrating oil | To loosen stuck nuts and bolts. |
| Putty knife, wire brush, or paint scraper | To clean the blade and the mower housing. |
| Vise or C-clamp | For holding the blade while sharpening. |
| Sharpening tool (metal file, sharpening stone, or angle grinder) | It sharpens the blade. |
| Blade balancer, screwdriver, or a nail | To balance the blade. |
Step-by-Step Process to Sharpen Mower Blades
Sharpening mower blades can seem scary and hard, but it’s surprisingly easy and safe once you know what to do. Here’s a detailed guide for sharpening lawn mower blades to help you ace the process:
1. Remove the Blade
Before starting, check the mower’s manual for blade removal instructions and the correct wrench or socket size.
Next, disconnect the power source. The blades can spin at 3,000 RPM and cause severe injury.
How to disconnect the power source by mower type:
- Gas-powered mowers: Disconnect the spark plug and tape it aside. Empty the gas tank to prevent fuel spills.
- Electric mowers: Unplug the cord or remove the battery.
Blade removal steps:
- Tilt the mower on its side (air filter and carburetor facing up for gas mowers).
- Wedge a 2×4 wooden block between the blade and the mower housing to keep the blade from spinning.
- Mark the blade’s grass-facing side with paint or a marker. It guarantees you’ll know how to put it back on correctly.
- Use a ratchet and socket (or a wrench) to remove the mounting nut or bolt (typically counterclockwise) and release the mower blade.
- For a dual-blade mower, remove the central nut first, then the smaller nuts that keep the two blades together.
If the hardware is rusted or stuck on too tightly, soak the nuts or bolts in penetrating oil (like WD-40) and let it sit for a few hours. Then try again.
Pro Tip: A long-handled wrench will give you more torque.
See Related:
- Gas vs. Electric Lawn Mowers: What’s the Difference?
- Best Gas Lawn Mowers [Reviews]
- Best Electric Lawn Mowers [Reviews]
2. Clean and Inspect the Blade
Next, clean the blade. Wipe and/or rinse off grass, mud, and dirt, and soak the blade in penetrating oil or Super Clean if it’s especially dirty. A wire wheel and a drill can help remove stubborn grime. Make sure the blade is dry before working on it.
Also, you can take this time to clean the lawn mower deck. Rinse and wipe away dirt, grass clippings, and rust. If the dirt is caked onto the mower, you can use a paint scraper, a putty knife, or a wire brush to scrape it off.
Before working on the blade, secure the mower blade with a vise or a clamp and inspect it:
- A few dents and a dull blade mean you need to and can sharpen it.
- Strongly consider getting a replacement mower blade instead if your mower blade is cracked, missing large chunks, or bent.
3. Blade-Sharpening Techniques

Each homeowner has their favorite method to sharpen mower blades, and you’ll also get to test and discover yours. It depends on available time, how comfortable you are with power tools, and how often you need to sharpen the blades.
Here’s a short overview of the most common DIY sharpening methods:
| Metal File | Blade Sharpener Drill Attachment | Bench Grinder or Angle Grinder |
| Duration: 30 to 45 minutes | Duration: 15 to 20 minutes | Duration: 5 to 10 minutes |
| Pros: – It’s safer and more precise. – The best option for beginners. | Pros: – It allows for good control. – Moderate speed. | Pros: – Very fast and efficient. |
| Cons: – Requires more effort and time. | Cons: – Requires a steady hand. – Can lead to inconsistent results. | Cons: – Requires experience.- Easier to make mistakes. – Can overheat the blade. |
| Best for: Occasional use. | Best for: Regular maintenance. | Best for: Intensive use. |
No matter the method you choose, keep the factory bevel angle, which is usually 30 to 45 degrees. “This ensures durability while maintaining a sharp cutting edge,” explains Keeley.
He adds that sharpening at a steep angle (under 30 degrees) makes the blade sharper, but the edge will wear down more quickly. A blade sharpened at an angle over 45 degrees, on the other hand, “dulls faster and causes ragged cuts.”
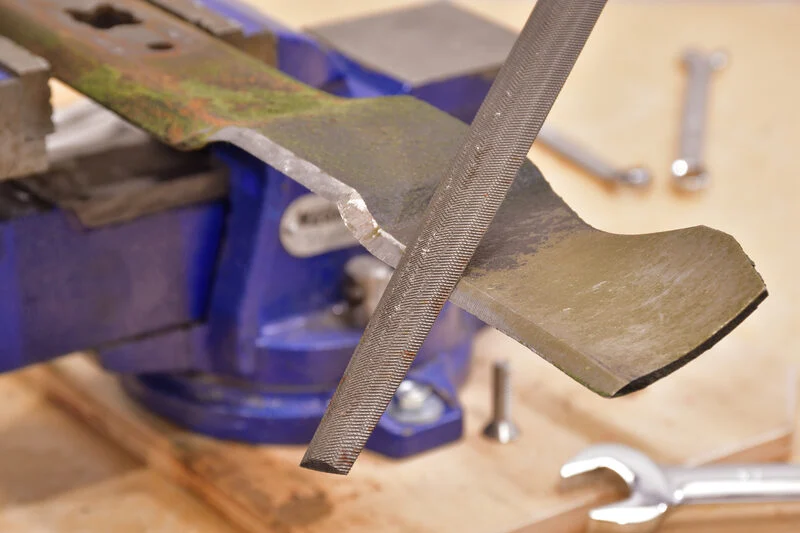
How to Sharpen Mower Blades With a Metal File
This tried-and-true sharpening method gives you the best control over the process, ensuring a perfect edge without the hassle of power tools.
A manual lawn mower blade sharpener is also the most forgiving and a good way for beginners to start honing mower blades at home. Yes, it takes a little elbow grease — about 50 strokes — but the payoff is a well-maintained blade that slices through grass like a pro.
What you need for this method:
- Vise or C-clamp
- Metal flat file at least 10 inches long (aka Mill File (Bastard Cut))
- Work gloves and protective goggles
How to sharpen a mower blade with a metal file:
- Fasten the blade in the vise.
- Position the metal file at the same angle as your mower blade (usually 30 to 45 degrees).
- File in one direction going from the inside edge to the outside edge; never go back and forth. “Use long, smooth strokes,” says Keeley.
- Hone the blade following its cutting edge. Even out nicks you come across by filing the blade edge until it’s straight. Keep going until you see a shiny silver edge.
- Check the blade’s sharpness periodically. Aim for a “butter knife” edge that doesn’t cut your skin. A razor-sharp edge is too sharp; it dulls faster and is more likely to chip.
- Once one edge is finished, remove it from the vise or turn it over. Then, repeat steps 1 to 4 with the other edge.
You can see an example of how it’s done in this video:
Common mistakes:
Skipping regular lawn care maintenance. Manual filling requires more effort on neglected, worn blades.
How to Sharpen Mower Blades With a Drill Attachment
Each homeowner has a preferred method, but generally, a drill attachment is considered the best way to sharpen lawn mower blades DIY. Why? Well, it’s faster than filling by hand, effortless, and beginner-friendly.
More precisely, the drill bit sharpener is easier to control than an angle grinder and includes a plastic guide that helps maintain a consistent sharpening angle.
What you need for this method:
- Vise
- Power drill (corded or cordless)
- Mower sharpening kit
- Safety gear
Step-by-step guide to sharpening a mower blade with a drill attachment:
- Clamp the blade in a vise with the cutting edge up.
- Insert the blade sharpener bit into your power drill and tighten the chuck. Pull the drill trigger to ensure it’s attached securely.
- Position the grinder stone using this alignment tip: “Like goes with like.” The flat guide piece goes against the flat back side of the blade, while the bevel of the grinding stone is aligned with the 30 degree factory edge of the blade. The blade should be sandwiched perfectly between the two pieces.
- Run the drill and glide the sharpener smoothly back and forth along the blade’s edge. Apply light but steady pressure to repair nicks in the blade. Give the blade a pass four to five times while trying to keep the factory angle.
- Check the blade’s sharpness. It should be as sharp as a butter knife.
- Release the blade from the vise or clamp and turn it over to sharpen the other edge. Repeat steps 3 to 5.
Here’s a video that shows the process:
Common mistake: Not clamping the blade. It’s difficult to follow the blade angle if you hold the blade in your hand while sharpening.
How to Sharpen Mower Blades With an Angle Grinder
Using an angle grinder is the fastest way to sharpen a lawn mower blade at home. Once you get the hang of it, you can sharpen both edges in a minute.
However, this powerful tool demands steady hands and precision. It’s easy to remove too much metal, overheat the edge of the blade and ruin its temper or hone the edge into the wrong angle. Try it out on some old blades to get a feel for the tool.
What you need for this method:
- Bucket of water (to cool the blade if overheated)
- Vise or clamps
- Angle grinder (ideally a 4.5-inch model)
- Grinding wheel
- Safety gear (safety goggles, hearing protection, and work gloves)
Pro Tip for Beginners: Try out this method first with a flap wheel instead of a grinding disk. Flap wheels remove less metal, protecting the blade’s integrity. If using a flap disk, use a medium-fine disk with 60 to 80 grit.
Here’s how to sharpen your mower blade with an angle grinder:
- Clamp the blade into the vise.
- Align the flap wheel with the cutting edge of the blade and follow the angle of the blade (usually 30 to 45 degrees).
- Move the grinder slowly, going from the inside edge to the tip.
- Smooth out any existing nicks.
- If the blade starts getting hot, dunk it in water.
- Check the blade’s sharpness. It should be as sharp as a butter knife; any sharper than that exposes the blade to faster dulling and chipping.
- Take the blade out of the vise or clamp and turn it over. Repeat steps 2 to 6 to sharpen the other edge.
Keeley advises homeowners to avoid putting too much pressure on the sharpener. ”If using a grinder, apply light, steady pressure to avoid overheating the metal,” Keeley says.
You can see this type of lawn mower sharpener at work in this video:
Common mistakes:
- Applying too much pressure. It removes too much metal and overheats the blade.
- Overheating the blade. If it’s hot to the touch, it’s too hot. Dip it in water.
- Inconsistent sharpening angle. This leads to a crooked blade that doesn’t cut smoothly.
Note: With a bench grinder, the grinder stays put, and you move the blade bevel. It’s the least precise, can take a lot of metal out of the blade, and requires a lot of experience. We only recommend it if you’re familiar with this tool.
4. Balance the Blade
Sharpening removes metal from the blade, so you may end up with more metal on one side, making it heavier and the blade unbalanced.
An unbalanced blade will wobble, vibrate, and spin awkwardly. That annoying wobble isn’t just a nuisance. The excessive vibrations can damage the mower deck, shaft, and bearings, leading to expensive, avoidable repairs. Only install the blade after you ensure it’s balanced.
The best tool for checking a mower blade’s balance is a blade balancer — a cone-shaped device you can buy for $5 to $10. You can also use a nail on the wall or a screwdriver.
Here’s how to check your blade’s balance:
- Place the blade on the balancer, nail, or screwdriver inserted through the center hole.
- Let your blade settle and observe its position.
- If the blade is level, it’s balanced, and you can go ahead and install it.
- If it drops or leans toward one direction, the side that drops is heavier and needs more work.
How to fix an unbalanced blade:
- Sharpen the heavier side slightly to remove more metal.
- Check the blade’s balance again afterward.
- Repeat until the blade is balanced.
Once your blade is balanced, it’s time to reinstall it.
5. Reinstall the Blade
If you haven’t cleaned the underside of your mower’s deck yet, do so now. Make sure there aren’t any mud or grass clippings stuck under there.
- Put the blade back onto the mower shaft with the right side down (check the mark).
- Lightly lubricate the bolt or nut with a general-purpose oil to prevent rusting and seizing. Put the piece back on and screw tight enough to keep the blade in place.
- Insert the 2×4 wedge again to keep the blades from spinning.
- Then, use your ratchet and socket or your wrench to tighten it until it feels secure.
Reconnect the power source — the spark plug, cord, or battery — and add fuel to your gas-powered mower if necessary. Start your mower, listen for strange noises, and feel for excessive vibrations.
If nothing seems amiss, then pat yourself on the back. You’ve successfully sharpened your lawn mower blade!
Pro Tip: If you can, keep a spare lawn mower blade sharpened. That way, if your current blade becomes dull unexpectedly, like after hitting a rock, you can swap out the sharpened one.
Maintenance Schedule
The best time to sharpen mower blades is in the spring, at the beginning of the mowing season, to ensure the mower is at its top performance.
How often should you sharpen mower blades? The University of Florida Extension says you need to sharpen your mower blades at least twice a year. “Blades may need more frequent sharpening depending on the size of your lawn, grass type, and how often you mow.”
Consider sharpening the blades:
- After 25 hours of lawn mower use, or about twice a season.
- If you hit a rock or other object while mowing. (Hitting rocks will nick your blade.)
- When mowing requires extra effort.
- When the grass looks ragged after mowing.
Here’s a basic seasonal schedule for lawn mower blade maintenance:
- Spring: Complete blade inspection and sharpening along with full lawn mower maintenance. (Check out our DIY Lawn Mower Maintenance Guide for details.)
- Summer: Check the blade edge every 25 hours of mowing.
- Fall/Early Winter: Deep clean and rust prevention treatments. Replace degraded blade.
Pro Tips:
- Clean the blade and mower housing frequently in a wet climate to prevent rust.
- Inspect the mower blade after each use if the lawn grows on rocky soil.
- Check the blade every 10 to 15 hours if you’re mowing a lawn on sandy soil.
See Related: Lawn Mowing Tips: How to Mow a Lawn the Right Way
When to Call a Professional
Avoid working on blades with deep cracks and nicks or severe bending. Blades with this level of damage should be sharpened only by a professional. Mower maintenance pros can tell for sure if a blade is salvageable or if it is better to replace it.
Professionally sharpening a mower blade costs $5 to $30.
When to Replace Rather Than Sharpen
Replace the mower blade if:
- It has significant bends or cracks.
- It has deep nicks you can’t sharpen away.
- More than 1/3 of the blade material is worn away.
- The blade is less than 1/2-inch thick.
Mower blades cost about $15 to $25 apiece with a DIY installation or $25 to $35 per blade if you have them professionally installed. As a general rule, consider replacing the blades every 1 to 2 years.
FAQ
To keep the mower blades from getting dull:
• Remove rocks, sticks, and debris from the lawn before you mow.
• Don’t cut the grass too low.
• Clean the mower blade after each use to prevent rusting and dulling.
• Treat the clean blade with penetrating oil to protect against corrosion.
• Alternate between two sets of blades.
• Use blades with hardened steel edges.
Yes, it is possible to fix minor bends, but it’s usually not recommended because the metal is weakened at the bend point. The repaired blade might hide microfractures that can lead it to snap at any time, and it’s harder to balance. Severely bent blades should simply be replaced.
Technically yes, you can sharpen a mower blade without removing it from the lawn mower. However, we really don’t recommend it. It’s not as safe, and you can’t check the blade’s balance afterwards.
Hire a Pro to Help Mow Your Lawn
Don’t want to spend time sharpening your mower blades and maintaining your lawn equipment? Hire a pro instead. LawnStarter can connect you with local lawn care pros who carry well-maintained equipment and can keep your lawn vibrant, lush, and perfectly manicured.
Janine Caayao contributed to this article.
Read More:
Sources:
- Cornell SIPS (2016, March). Sharpen Your Mower Blade. [Video]. YouTube. https://www.youtube.com/watch?v=T3gQ2rokCsw
- Florida-Friendly Landscaping Program (2023, February). Sharpening Mower Blades. https://ffl.ifas.ufl.edu/resources/ffl-minute-radio/2023-archive/february-2023/sharpening-mower-blades/
- Jason Keeley, Mowing Magic
* LawnStarter participates in the Amazon Services LLC Associates Program, an affiliate advertising program. LawnStarter may earn revenue from products promoted in this article.
Main Image Credit: isuaneye / iStockPhoto / License